|
|
|
|
Other Radios - Wood Tabletop: Philco PT-15 Restoration
|
| |

|
|
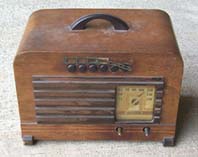
The PT-15 as found
|
A radio with both pushbuttons and a handle?! Wow, I had to have this one. As you
can see from the photos, however, it really needed some work. The case is really in
excellent shape, with no veneer damage. However, the lacquer was flaking off badly,
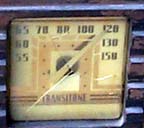
both on the body and on the dark brown grille trim. The dial lens plastic is cracked
in several places, and the radio was missing its knobs. For this, the seller wanted
$59! I got it for $25, which was probably still too much, but after a day of radio
hunting, I didn't want to go home empty handed.

|
|
Broken dial closeup
|
Cabinet Restoration
The first thing I did was to remove the chassis from the case, which was
quite easy. Once the chassis was free, I took a closer look. The dial lens
was held on by four staples and was removed. The handle, held on by two
screws, was also removed. The station-tab holder above the pushbuttons was
in poor shape, as you can see from the photo. It had come undone on one end,
and gotten sort of mangled. I removed the two remaining nails and set it aside.

|
|
PT-15 Pushbuttons
|
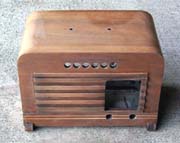
After examining the case more closely, I decided to completely strip it and refinish
it. I don't always do this, but this case was in pretty poor shape and really needed
a lot of help. Stripping this small radio was a quick job. I used Park's Furniture
Refinisher, which is about my favorite product for removing a lacquer finish. You simply
wet some 000 steel wool in the refinisher, and scrub the surface. The lacquer melts
and can be wiped off with paper towels. It only took about 20 minutes to remove
the finish. The stripped radio is shown on the right.

|
|
Stripped PT-15
|
The dark colored wood on the grille turned out to be walnut - just like the rest
of the case. It had simply been darkened using toning lacquers. In the book,
this radio is listed as having black lacquer trim. The trim on my example was in
pretty bad shape, as 60+ year old lacquer typically is. I decided to redo the
grille and feet in their original black.

|
|
New foot
|
First, I had to fix some damage to the case. Part of one of the "feet" or runners
on the bottom of the case was gone. Because I was going to use black lacquer here
anyhow, the type of wood didn't matter so much. I used a piece of craft wood
which was whitled down to size. I then filled the cracks in between the old and new
pieces with wood dough and sanded it down.
The next step was to lacquer the black trim. I carefully taped everything off,
and then sprayed on multiple coats of Ace Hardware's Gloss Black Lacquer. Once the
lacquer was dry, I removed the taping and paper, and buffed it down with a fine
steel wool. I then stained the case with a medium walnut stain, to cover up any
variations in color. Then, I sprayed on several coats of gloss lacquer.

|
|
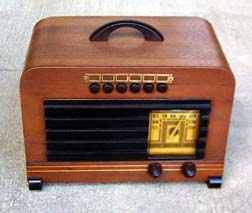
The finished PT-15
|
After the lacquer was done, I again rubbed out the finish with some 0000 steel wool,
and at this point, the case was mostly done. I re-attached the handle. I then
used some steel wool to clean up the brass station-tab holder which attached
above the pushbuttons (it was green). Once that was cleaned up, I carefully straightened and
flattened it. I reattached it to the case using three brass wire nails, which I had
to clip to be short enough. Finally, I put two brown Philco knobs on. The completed radio is shown on the left. I think this
one turned out really well.
I haven't really had a chance to check out the electronics yet, but that will
be next! Stay tuned!
|
|


