I purchased this Stewart Warner off e-Bay in 2002 or 2003. It looked pretty good in the photos,
but upon arrival, I found that someone had drilled multiple holes in the side of the case, and
the seller had not disclosed this fault. A few stern e-mails later, I had a partial refund, but a
still damaged radio. It went into the basement for a few years before I pulled it back out in the
fall of 2005. The radio needed refinishing, and had veneer chips in the front as well as holes
and chips in the sides.
Electronically, The chassis looked to be
complete, but I did not power it up. I pulled the chassis to save for a wintery
day.
Cabinet Restoration
|
|
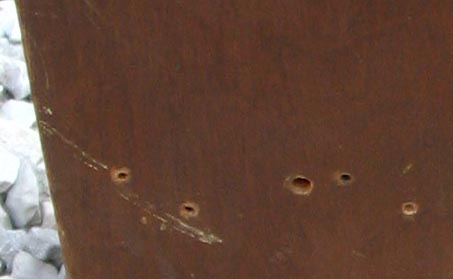
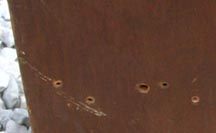
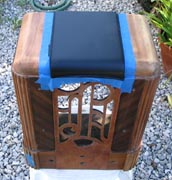
Holes drilled in case
|
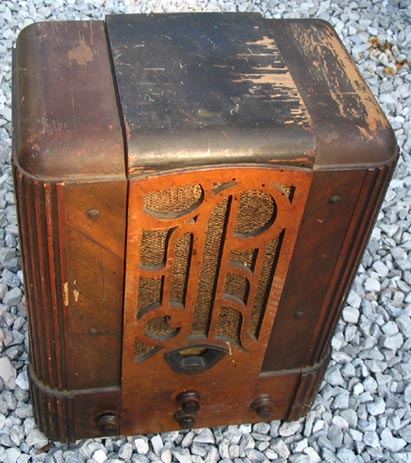
The case of this radio is made with some really fine veneers. A maple burl makes up the
front panel, with a straight-grained walnut flanking each side, in a chevron style pattern. The lower edges of the
front and sides are also walnut, with the balance of the cabinet being toned poplar. The
columns are fluted, with black details on the inside. This was going to be a lot of work!
The photo to the right shows the holes in the side of the case. These did not penetrate all the
way through the wood to the inside. The easy thing to do would probably have been to just fill
the holes, and tone the entire piece. I would not have been pleased with this. I decided to re-veneer
that panel. I set a damp towel on the side of the radio overnight, which allowed moisture to penetrate
into the wood and moisten the old glue. The next day, I used a flat scraper and removed the old
piece of veneer.
|
|
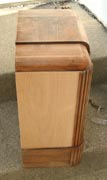
New Side Veneer
|
A new piece of poplar (or was it birch?) veneer was cut and trimmed, and attached using contact
cement. The photo to the left shows the new veneer on the side. The balance of the radio was stripped using Parks Refinisher and 000 steel wool.
There was quite a bit of additional
veneer work to be done to the radio. A patch was made on the lower left corner of the front burl,
as well as patches on the lower edges of the side, where the walnut veneer was badly chipped. This
radio really needs feet on the bottom to keep the edges from scraping and chipping. It did not have
any.
Once all the patches were done, the radio was carefully sanded down a bit, and then grain filled.
The front burl doesn't really need it, but the walnut trim must be filled to achieve a nice finish.
I generally fill the walnut areas twice.
|
|
Spraying top black lacquer
|
The photos to the right show the top being sprayed. The black areas must be absolutely smooth
or even the smallest defect will show up. A few dings were filled in using wood putty before
spraying. I like to spray a flat black, then use the clear gloss or semi-gloss topcoat to shine
it up. I also sand black areas a few times in-between coats to build a really smooth, thick coat.
Once the top was done, I toned the sides and top curved panels, as well as the fluted columns
on the side. This requires taping off the other areas. When the toned areas are done, I then
unmask the other areas, and lightly tone them to give a similar tint to the areas already toned.
The black details in the fluted columns were hand painted using a small artist's brush. In hindsight,
I should have taped all these off and sprayed them. Upon close examination, small brush strokes
are evident in the fluted areas. Once the black details were done, I then sprayed many clear
coats of lacquer over the entire radio.
|
|
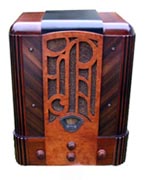
Done!
|
The radio was rubbed out with various grades of sand paper and compounds, and brought to a nice
shine. The grille cloth was re-installed, and the knobs were stripped and refinished.
The image on the left shows the completed radio. I think it
turned out very well! The radio really has great style, but that is to be expected from
such a quality cabinet manufacturer as Stewart Warner. I think the refinish turned out
well, but it was a very difficult radio to complete. The side looks much better without
the holes, and I don't regret taking the time to replace the veneer, as opposed to simply
filling the holes.