|
|
|
|
Postwar Bakelite Radios: Meck 5A7-PB11 Restoration
|
| |

|
|
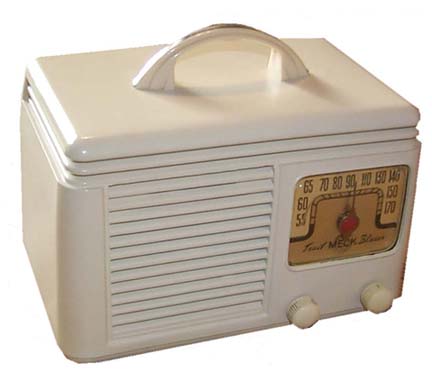
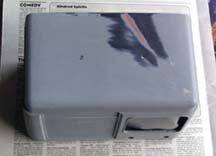
Meck radio as found
|
I purchased this Meck off of E-bay, knowing that the case had a nasty
crack in. I think this is the Meck model 5A7-PB11, from 1948, but
the label on the case is torn so I'm just guessing. When I received
the radio, I was happy to find that it did work! Also, the crack did
not look impossible to fix. It's hard to see in the photo to the left,
because the handle on the radio is blocking it. I suspect the crack
is in fact due to the handle. The crack begins in an area near one
of the screw holes for the handle. Some unsuspecting repairman may
have tightened the handle too tight, causing the bakelite to crack. The black dot on the lefthand (volume)
knob is a screw. I'm not sure why the knob on the left has a screw
and the knob on the right does not.
|
|
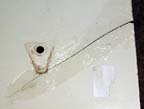
Crack in top of case
|
I have had very good luck gluing bakelite with a 60-second epoxy from Ace Hardware,
while supporting a crack or chip from underneath with hard plastic. The photo
on the right shows the top of the case, with the handle removed. The crack
is very apparent. This is a tight crack, without any loss of bakelite. I
glued the case from underneath, supported by a piece of plastic. I also spread
some epoxy on the top, to try and get it into the crack for added stability. I
gave the epoxy some time to set, and then sanded the top of the case. The epoxy
sanded down quite well, and I was hopeful that all that would be needed now
was a coat of primer and paint to finish the radio.
|
|
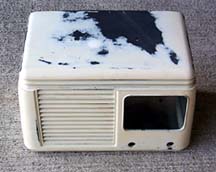
After sanding
|
While I was sanding, I went ahead and sanded some of the other areas of the case
where there had been paint chips. The case was really in pretty good shape.
The photo to the left shows what the case looks like after a good sanding.
I usually start with a grittier paper, such as 220, then move down to 400. You
need to smooth the paint chips out, as well as "feathering" the current paint
into the bakelite. It's always a good idea to run your finger over the
sanded area, to see if you can feel the edges between the paint and the
bakelite. It's also a good idea to take a look at the case in a bright, outdoor
light. That can help you to see defects which may not be noticeable indoors.
|
|
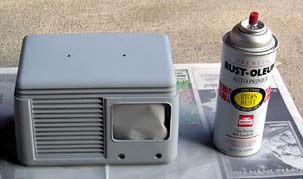
First priming
|
Once the radio was sanded down, I primed the radio with a standard gray primer.
In this case, I just used a regular Rustoleum primer which I purchased from
the local hardware store. It seems to work fine. The primer dried quickly,
and I was able to see if my repair was noticeable. You can't see it in the photo, but I was still able to see
traces of the
sealed crack. I decided to put a thin layer of glazing putty over the crack,
to help conceal it. Glazing putty is used in auto-body repair to cover
small imperfections. It can be sanded and painted. It dries quickly, so it
is easy to do several applications in one day. This time, it only took one application.
I smoothed a very thin layer of glazing putty over the crack. After it
was dry, I sanded it using a fine grade paper and a sanding block. The sanding
block is important, to make sure that the repaired area is flat.
|
|
After glazing and more sanding
|
The photo to the left shows the radio after applying the glazing putty. Sanding
the glazing putty down removed some of the primer, but that is ok. Once the
glazing putty was sanded smooth, I went ahead and shot another coat of primer
on the radio. I then sanded the primer down carefully with a fine grade paper,
and then went ahead and began to spray the final coats of white paint on.
I decided to use Krylon's Antique White on this radio, because it seemed to
be a close match. I shot on the paint very carefully, doing thin coats and then
waiting 5-10 minutes before applying another coat. I tend to get too
enthusiastic about painting, and shoot too much on at once, causing runs. Then,
I have to go back and sand them out, repaint, etc. By putting on many light
coats, I can avoid that problem. After a few light coats, the radio was
pretty much covered. At this point, I stopped, and let the radio cure for a day.
I then carefully sanded the radio again, to remove any trace of dust, or particles
that may have gotten into the paint. I then put a few more light coats of
paint on the radio. After the paint had cured, I again lightly sanded it, then
polished the radio to its final state.

|
The finished radio
Click to Enlarge
|
After the case was done, I carefully cleaned the metal foil dial, as well as
cleaning up the plastic dial cover. I then reassembled the radio, with the
finished radio shown on the right. I'm very pleased with the final result! It's
hard to believe that only a couple days earlier, this radio was chipped and
cracked and looked like junk!
Electronically, the radio worked as found. I haven't done any work to it, but
I may clean the chassis and replace the old capacitors at some point to ensure
good performance for a
long, long time.
|
|