|
|
|
|
Other Radios - Wood Tabletop: Emerson 534 Restoration
Even someone who likes plastic radios likes wood radios, too! And, uhh,
these radios have plastic in them at least...on the knobs, the dials, etc!
|
| |
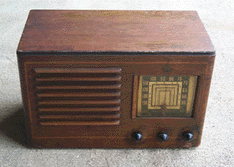 I picked up this Emerson at a local antique mall for $20. Usually,
when I see a radio for $20, I buy it regardless. I seem to like the
real loser radios, which eat up lots of time. Well, this one shouldn't
be too bad. The case is in great shape with no chips, cracks, etc. The
finish is destroyed though. It will need to be stripped and refinished.
The knobs are there, which is good. This one is an Ingraham cabinet,
as well. I think it will look great once it's done.
I picked up this Emerson at a local antique mall for $20. Usually,
when I see a radio for $20, I buy it regardless. I seem to like the
real loser radios, which eat up lots of time. Well, this one shouldn't
be too bad. The case is in great shape with no chips, cracks, etc. The
finish is destroyed though. It will need to be stripped and refinished.
The knobs are there, which is good. This one is an Ingraham cabinet,
as well. I think it will look great once it's done.
|
|
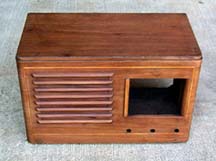
After stripping
|
The radio has a newer cord on it, so someone worked on it at some point.
It powers on, but there is no sound. I'll have to check that out!
Cabinet Restoration
The lacquer finish on this radio was nearly gone. In many places like the top,
it had completely flaked off. The only choice for this radio was to completely
strip off the old finish and apply a new lacquer finish. I removed the finish
with steel wool and Park's Refinisher. It took about 30 minutes to get all
the finish off, and I ended up using a toothbrush to get into the detail
areas on the front grille. The case looked pretty good after stripping, as you
can see on the right.
|
|
Lacquering black trim
|
The top edge needed a black strip, which I applied with Ace Hardware Gloss
Black Lacquer. I taped and papered off all the other areas of the case,
and then applied several light coats of lacquer to get the desired black
color in this area. Once the lacquer was dry, I removed the paper and tape and
lightly sanded down any areas where the lacquer had bleeded. I then lightly
stained the case with special walnut stain.
|
|
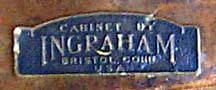
Ingraham label
|
Once the radio was stained, I
applied several light coats of clear lacquer, while rubbing out the finish
in between. This provides a nice smooth finish, yet it isn't so glossy
that it looks brand new. The case turned out pretty well. The inlay wood
is much more apparent, and it looks great. The last step was to clean up
the dial plastic, the knobs, and re-assemble the radio. The completed radio
is shown on the below on the left.

|
It's done!
Click for a larger picture...
|
Electronic Restoration
I've got the replacement capacitors for this radio in hand, I just need to
install them! I'm hoping that will fix whatever problems this radio has.
|
|


