|
|
|
|
Other Radios - Wood Tabletop: Delta DeLuxe Restoration
Even someone who likes plastic radios likes wood radios, too! And, uhh,
these radios have plastic in them at least...on the knobs, the dials, etc!
|
| |
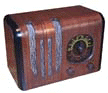
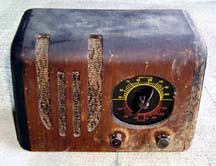 I picked up this radio in the fall of 1999 at a local antique shop for $19.
The radio really looked
pretty rough, however, it looked like a good project with tons of potential.
The wood was in great shape, but it was very dirty (this picture
was taken of the radio in "as found" condition). The knobs were there, and the
dial pointer is very colorful and unique. The grille cloth was in good shape.
The seller seemed to think that this was an American Bosch radio, but I can't find
any manufacturer information of any kind on the radio. I have also checked all
my radio books and can find no match. In September 2000, I have finally
determined what this radio is! It is called the Delta De Luxe, and a photo
has been addded below of this radio (from an e-Bay sale). My radio is
missing the metal tag on the front, and no nail holes are visible in the case.
Perhaps it never had a tag?
I picked up this radio in the fall of 1999 at a local antique shop for $19.
The radio really looked
pretty rough, however, it looked like a good project with tons of potential.
The wood was in great shape, but it was very dirty (this picture
was taken of the radio in "as found" condition). The knobs were there, and the
dial pointer is very colorful and unique. The grille cloth was in good shape.
The seller seemed to think that this was an American Bosch radio, but I can't find
any manufacturer information of any kind on the radio. I have also checked all
my radio books and can find no match. In September 2000, I have finally
determined what this radio is! It is called the Delta De Luxe, and a photo
has been addded below of this radio (from an e-Bay sale). My radio is
missing the metal tag on the front, and no nail holes are visible in the case.
Perhaps it never had a tag?
Electronically, the cord on the radio was cut. The tube lineup for the radio is 25Z5, 43,
6C6, 6D6, and a metal 6-pin tube on which the number is corroded.
Cabinet Restoration
|
|
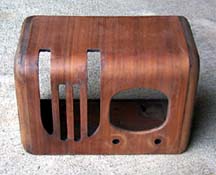
The newly stripped cabinet
|
As you can see from the photo above, the finish on the radio was a complete disaster.
The only choice was to strip the old lacquer finish off, and refinish the radio. First,
I carefully removed the grille cloth and the radio dial. The chassis had already been
removed for restoration. Then, I
decided to use a furniture refinisher product which I have had good luck with before.
You simply dip #0000 steel wool into the refinisher (wearing gloves it a must) and then
scrub the wood in a circular motion. The old lacquer finish immediately begins to
loosen and liquify, and it can then be wiped off. This form of refinishing seems to
be very easy on the wood. It took about 25 mintues to remove the finish from this
radio. I then wiped it down with a clean rag and turpentine to make sure all the
refinisher was off, and the wood was clean. It's amazing how much better it looks
already - the photo on the right was taken just after the radio was stripped
, and it already looks a hundred times better.
|
|
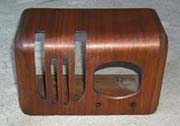
The stained cabinet
|
The next step was to apply a light stain to even out the color on the radio.
This radio appears to be walnut, like many radios of the 1930's. The wood was
in pretty good shape, so I put on a thin layer of oil stain, called special walnut.
I brushed on a thin layer using a disposable foam brush, and let the stain soak into
the wood for a minute or two. I then wiped the radio down with an old sock (they're
great for staining) to remove any excess stain. One coat of stain seemed to be
enough, and the radio looked great.
|
|
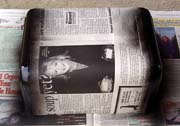
Spraying black lacquer
|
On many other radio projects, I have also applied a coat of toning lacquer to the radio
to smooth out color differences between different pieces of wood. On this radio, that
wasn't needed. The wood looked fine with just the stain. However, I did need to apply
black lacquer to the "shoulders" of the radio. In the initial photo above, you can
see the black lacquer on the left side of the radio. The lacquer on the right hand
side was somewhat scraped off. The black lacquer provides a real contrast, and this
was popular on many radios of the 1930's. I carefully taped and newspapered the areas
of the radio that didn't need to be sprayed black, hoping that there wouldn't be
any overspray. I then sprayed on several light coast of Ace fast drying black lacquer.
Several light coats keeps the lacquer from running, and it dries within minutes. It only
took about 15 minutes to completely coat the areas. I then let it dry a bit longer,
and then removed the tape and paper. The trim looked great. I removed a bit of
overspray from some areas with some #0000 steel wool, and then touched those areas
up with stain.
|
The finished radio
Click for larger picture...
|
Once I was sure the black lacquer was dry, I went ahead and rubbed it down with
#0000 steel wool. This assured a nice, smooth finish. Once that was done, I
ran over the rest of the case with the steel wool, and then ran a tack cloth over
the radio. The last step was to spray on several light coats of clear lacquer,
carefully rubbing the finish in between coats.
When the case was done, I re-installed the plastic dial and the grille cloth.
The finished radio is shown on the
left. I'm very happy with how the radio turned out!
Electronic Restoration
When purchased, this radio had its cord cut. Usually this means the radio did
not work, and the previous owner cut off the cord to make sure no one plugged
the radio in. My first step with a radio like this would be replace the electrolytic
capacitors. When I pulled the chassis, I was surprised the see the electrolytics
were in a paper box, with no markings on it. This presented quite a problem, because
I didn't know what values of capacitors to use. Without an ID of the radio, I couldn't
even get a schematic to work from. So, I posed a question looking for help in ID'ing
the radio on the antiqueradios forum. The guys there were able to help me determine
the values of the needed caps, without the schematic. I went ahead and added the
new electrolytics and attached a new cord. When I powered the radio up, I got a nice
explosion and some smoke! One of the capacitors had fried.
|
|
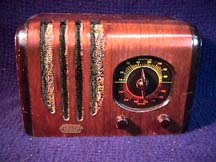
Another Delta De Luxe
|
What now? Well, back to the forums. It was determined that one of the regular capacitors,
which I hadn't yet replaced had blown. I replaced this one, and then tried the radio
again. The goods news was that there were no explosions. The bad news was that
nothing happened - no tubes lighting, etc. I then determined that the 25Z5 tube
was dead. Being wired in a series, if one tube is dead, none will light. I was
unable to find a 25Z5 locally to buy. Then, I decided to search a few of my older
sets, and presto! I found a 25Z5 that tested OK in my Detrola 134. With the new
25Z5 in place, the radio finally powered up. However, I was unable to receive
any signals. Then I remembered that this radio does not have a built in antenna. I
attached a long wire to the terminal and powered it back up. Sure enough, I was
able to pick up two of the stronger local stations.
At this point, the radio works ok. I have recapped it, and can pick up some of the
local stations. The volume is a tad weak, and the sound is not optimal. I will be
working on that!
|
|


