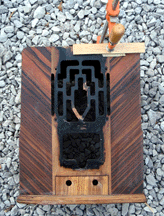
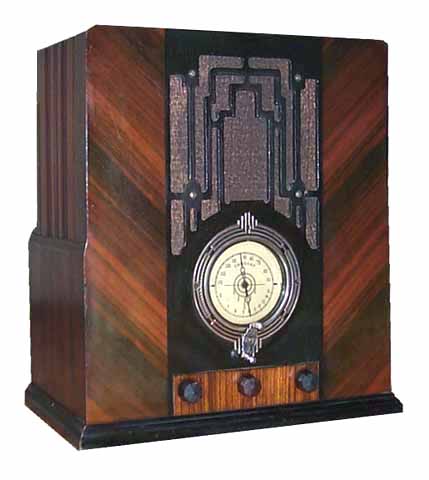
 I bought this Crosley tombstone off e-Bay at some point or another. I was mostly attracted
to the wide variety of veneers present on the cabinet. I'm a sucker for anything with chevron-pattern
veneer, black trim, zebrawood, etc. The columns appear to be brazilian rosewood. The small patch
under the knobs is zebrawood. The sides also have some rosewood, and the balance is a cheaper
wood which is toned to match. The chrome dial sets this off perfectly! The radio has a similar
cabinet style to my Crosley 713. The cabinet
is missing a trim molding on one side, has veneer damage across the top, and needs a refinish. I think
it will come out beautifully!
I bought this Crosley tombstone off e-Bay at some point or another. I was mostly attracted
to the wide variety of veneers present on the cabinet. I'm a sucker for anything with chevron-pattern
veneer, black trim, zebrawood, etc. The columns appear to be brazilian rosewood. The small patch
under the knobs is zebrawood. The sides also have some rosewood, and the balance is a cheaper
wood which is toned to match. The chrome dial sets this off perfectly! The radio has a similar
cabinet style to my Crosley 713. The cabinet
is missing a trim molding on one side, has veneer damage across the top, and needs a refinish. I think
it will come out beautifully!
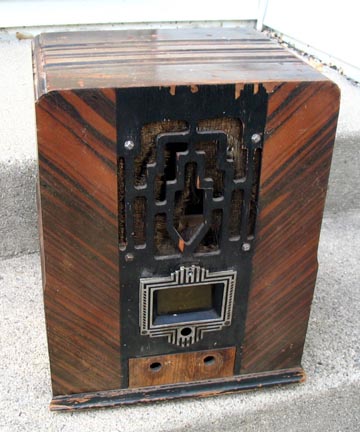
Electronically, The chassis looked to be
complete, but I did not power it up. I pulled the chassis to save for a wintery
day.
Cabinet Restoration
|
|
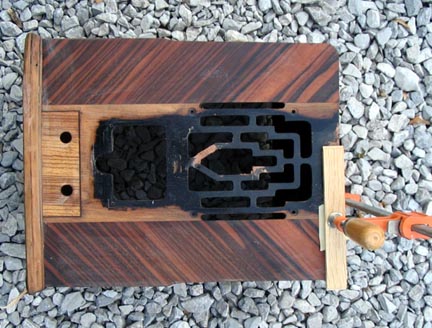
Clamping down veneer patch
|
The first thing to do was strip off the remaining finish. I used Parks Refinisher
and 000 steel wool to remove the old finish. I didn't bother to strip all the black
paint off the front, as this could simply be sanded down a bit and re coated. It saves
stripper, and time! The major problems with this radio were the veneer chips on the front,
and a missing molding on the side. I pirated a molding off a parts radio that has the same
style, and attached it. It didn't fit quite perfectly, but I was able to fill in the
openings with wood putty, as the trim was painted black anyhow.
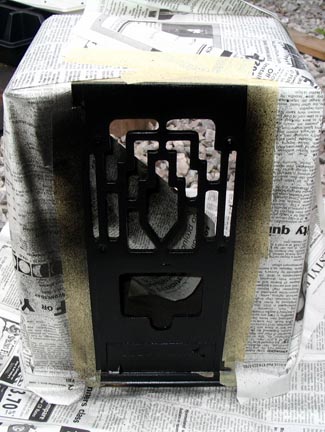
The entire grille area was unstable and chipping. I glued some chips back in, other places
I used wood putty (again, as this was to be painted black, this was not a huge issue). The
rosewood had a minor chip along the top right, where it met the black area. I trimmed an
appropriate sized piece of veneer with a similar grain, and glued it in. The photo above shows
this piece being clamped down hard so that it would not come loose. The edges were trimmed
after installation.

|
|
Applying black lacquer
|
I went ahead and grain-filled the cabinet, as this seems to provide for the best
possible finish. I used Bartley's dark on the rosewood areas, and Bartley's light on
the rest of the radio. I usually do two coats of filler, with a light sanding in between.
The photo to the left shows the black center piece being sprayed. I use flat black and
then top-coat with semi-gloss. High gloss, to me, is too shiny for an antique.
The top and sides of the radio are mostly a lighter toned, cheaper wood.
This wood would need to be toned darker. I chose Behlen Master
Toner Walnut, and sprayed it on the areas which needed to be toned. After the toners
had dried for a bit, I applied many light coats of clear semi-gloss lacquer on top.
|
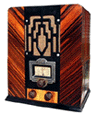
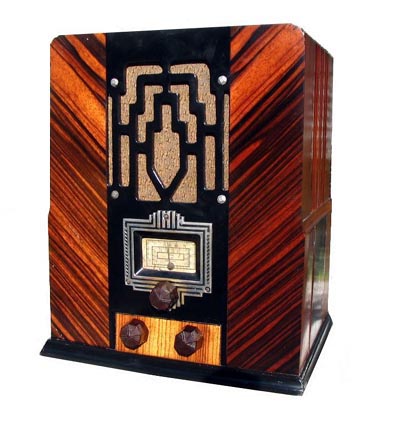
The Finished 5V1
Click for a larger picture
|
A new grille cloth was ordered, and several knobs were procured. The
radio finish was left alone for a week, then was rubbed out with progressively
finer grits of sandpaper and lemon oil. The chrome bezel and speaker screws
were polished up a bit. The completed radio is shown on the right. I think it looks
great!
This was a fun project. I like the look so much, I've since picked up another one of these radios, though
it's actually in a bit worse shape than this one. I hope to re-finish that one sometime
next year.


