|
|
|
|
Other Radios - Wood Tabletop: Crosley 515 Restoration
|
| |
 I bought this Crosley basket case off e-Bay in the fall of 2001 for under $30.
The radio was in terrible shape - missing some knobs, the cabinet had been
half belt sanded, so that there was some finish missing (and a lot of scratches),
plus there was white paint splattered on part of it. The grille cloth was gone,
but the one saving grace was that there was no cabinet damage (that is, no missing
veneer). It was rough - but it could be brought back to life!
I bought this Crosley basket case off e-Bay in the fall of 2001 for under $30.
The radio was in terrible shape - missing some knobs, the cabinet had been
half belt sanded, so that there was some finish missing (and a lot of scratches),
plus there was white paint splattered on part of it. The grille cloth was gone,
but the one saving grace was that there was no cabinet damage (that is, no missing
veneer). It was rough - but it could be brought back to life!
Electronically, The chassis looked to be
complete, but I did not power it up. I pulled the chassis to save for a wintery
day.
Cabinet Restoration
|
|
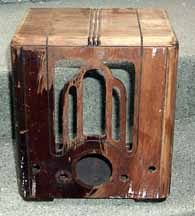
After stripping
|
The first thing to do was strip off the remaining finish. I used Parks Refinisher
and 000 steel wool to remove what was left of the finish, as well as some white paint
that had been splattered on the radio. The case was decent, but had some scratches
in it from being belt sanded (someone had tried to remove the lacquer by belt sanding
the radio!) I decided to sand the case a bit to remove the damage. I started with
220 grit paper and worked down to 600 grit. The scratches disappeared, and I was
left with a nice smooth case to work with.
|
|
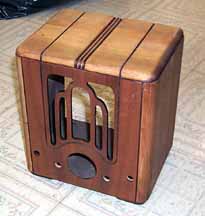
Applying toning lacquer
|
The photo to the left shows the radio being taped off for the spraying of toned
lacquer. As you can see from the "After stripping" photo, this radio is made with
walnut veneers on the front, but the rest of the radio is a lighter, cheaper wood.
This wood would need to be toned to match the walnut veneer. I chose Behlen Master
Toner brown, and sprayed it on the areas which needed to be toned. Working with toners
can be difficult, but this radio turned out quite well. After the toners
had dried for a bit, I applied many light coats of clear lacquer on top.

|
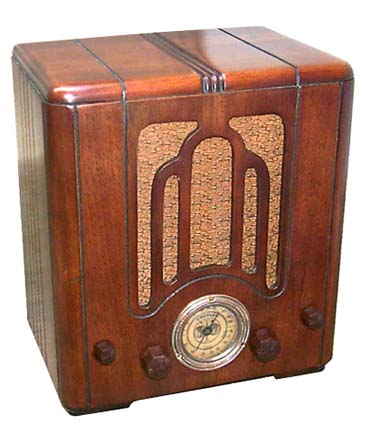
The Finished 515
Click for a larger picture
|
A new grille cloth was ordered, and several knobs were procured. The
radio finish was left alone for a week, then was rubbed out with progressively
finer grits of sandpaper and lemon oil. A little black paint was used to detail
the lines in the case, making them stand out a bit more. The completed radio is shown on the right.
Electronic Restoration
The chassis for the radio looked pretty good, so I began by replacing all the
wax paper capacitors as well as the electrolytics. I also tested and replaced
a few out-of-spec resistors. Then, power was applied. The radio came up, but
no sound was heard. The 515 schematic has a voltage table, and all the voltages
looked correct. What could be wrong? I tested the speaker and output transformer,
and both were ok. I swapped tubes to no avail. Finally, a detailed analysis
of the schematic showed that I had replaced a capacitor which had been wired into
the circuit wrong. When I replaced it, I also replaced it the wrong way! Moving
one lead of that cap brought the radio to life. It works pretty well, considering
it is a rather cheap radio of its day. I'm quite partial to these little sets - I have
another 515 (with veneer damage bought as a spare), and a 555 (which appears to be
the same as the 515, albeit with a different chassis) ready for restoration.
|
|