|
|
|
|
Other Radios - Wood Tabletop: Philco 38-12 Restoration
Even someone who likes plastic radios likes wood radios, too! And, uhh,
these radios have plastic in them at least...on the knobs, the dials, etc!
|
| |
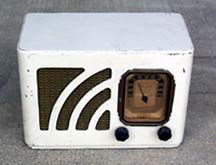 This is the third Philco 38-12 that I have seen, and it's also the third
one that I've seen painted white. I am almost SURE that these radios
did not come in white, however, and I can tell that this one has been
painted (the sloppy paint job is a dead giveaway). Why were so many of these
radios painted white by their owners? We'll probably never know. Regardless,
this example is in pretty good shape othewise. The dial and glass are great,
and the knobs are there. Not bad at all.
This is the third Philco 38-12 that I have seen, and it's also the third
one that I've seen painted white. I am almost SURE that these radios
did not come in white, however, and I can tell that this one has been
painted (the sloppy paint job is a dead giveaway). Why were so many of these
radios painted white by their owners? We'll probably never know. Regardless,
this example is in pretty good shape othewise. The dial and glass are great,
and the knobs are there. Not bad at all.
Electronically, the radio works as found.
Cabinet Restoration
|
|
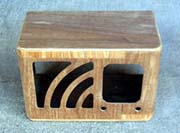
Stripped and sanded
|
Although the radio didn't look that bad in white, I decided to strip the paint
off and refinish it as it should be. After removing the chassis, grille cloth,
knobs, and dial glass, I coated the case liberally with citri-strip. The paint
began to bubble within a few minutes, and I was able to scrape the case mostly
clean with a putty knife. There was still some goo left over, so I then
switched to Parks refinisher and #000 steel wool. This took the remainder of the
paint off, and the original lacquer finish which was under the paint. Once the
paint was off, the beautiful contrasting wood veneers were now visible. This is
really quite a nice case, and I can't see any reason why it was ever painted in
the first place! The stripped case is shown on the right.

|
|
Painting bottom trim
|
Once the case was cleaned up, I took a closer look at it. There were a few areas
where white paint had gotten down into the woodgrain. I sanded these down to make
them less obvious. Then, I put on several coats of special walnut stain. Once
that was done, I sprayed on a coat of clear lacquer. It looked pretty good, but you
could still see some flakes of white under the lacquer. What to do? I decided to
layer on a few more coats of stain, with sealer coats of lacquer in-between. This
darkened the finish somewhat, but also covered over any areas where you could still
see a trace of the white paint (very few, but worth covering up). Then I sealed it
with a final coat of clear lacquer.
|
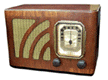
Finished!
Click for a larger image...
|
After the majority of the case was done, I did the black trim on the bottom edge
of the case. I taped and papered off the rest of the case (see photo above)
and then sprayed on a few light coats of gloss black lacquer. Once the lacquer
was dry, I buffed it down a bit with some #0000 steel wool so as to not look
quite so new. Then I cleaned up the dial glass, the knobs, and reinstalled
the grille cloth. The completed radio is shown on the right.
Electronic Restoration
The radio did work as found. It has a low hum, so at some point I may replace
the electrolytic capacitors.
|
|


